Wednesday, June 25, 2014

Anatomy of a Passing Sword

Along the lines of what I did for arrows, here's a visual guide to all the details of a passing sword. A special thank you to Sir Torrence for providing the cutaway pictures.
Click image to see full size

Monday, June 23, 2014

Garb Enforcement at Practice

Every year, there's a debate over how to handle garb enforcement.  Subsequently, the community usually ends in the same place: everyone agreeing that garb should be worn at events, some people insisting garb should be worn at practices, while others argue that requiring garb at practice is a death-kiss to recruitment.

I'm personally in the pro-garb at practice camp, with leeway given for newbies, because I've seen it done much more good than bad. At the very least, it helps prevent the rash of fighters who won't go to events because they need garb, or those who turn up at events without garb. In my experience, here's how it becomes a successful culture.
Some passing garb at practice.

Use role models

This is by far the most important step. If the top dogs in the realm wear garb, especially the top fighters, the rest of the realm will usually follow suit. It helps remove a bit of the goofiness factor when the toughest guys are dressed to the nines and are willing to defend their choice to wear garb every week. It doesn't need to be incredibly fancy, after all it is only practice, but enough to show they take pride in their appearance.

Don't bully, but be clear about expectations

If you come at someone aggressively about their lack of garb, they're going to get defensive and dig their heels in. If people understand why they should wear garb at practice, instead of being told "because I want us to", they're often more receptive. Following the rules, preparing for events, and PR are usually the reasons I give depending on my audience. Playing to their sense of pride may also work well in some cases.

If someone I know who has garb is not wearing garb at practice, the most I will say is a casual "No garb today?" and leave it at that. You can often make it clear that you've noticed someone isn't wearing garb and you'd prefer them to, without calling them out and loudly embarrassing them in front of everyone. Even I sometimes don't show up in garb because life got in the way, and I prefer the courtesy of a gentle reminder instead of a public flogging.

Make it a rite of passage

In the realms where garb is common at practice, wearing it is often seen as a literal or metaphorical rite of passage. In some places it gives you access to more weapons, since you've proven your dedication.  In others, it's the first step that marks you as a "real" Belegrim in the eyes of the realm.

Making or buying your first garb is usually met with praise and stories about how awful our own first garb was. If a new fighter really wants to become "one of the guys", they will force themselves to wear garb when everyone else is.

Treat it as a uniform

This is for the people who feel uncomfortable in garb because they're very self-conscious. Those of us who embrace our geekiness may have no problem hitting up a public restaurant after practice in full garb, but others find it mortifying. Make sure the non-garbers know that you'll give them time to change before and after practice; garb is only your uniform on the field. Having that level of separation between the game and real life is really helpful for many people.

Help them get their first set

Almost everyone struggled with their first set of garb, myself included. If someone seems to be dragging their feet, offer to make it for them or have sewing days if you need to. You can even hand them the names of a few good places to order a set.

Garb does not need to be expensive or time-consuming to pass, and many newbies may not realize that if your realm is particularly well-dressed. The more that veterans do to lower the bar to entry, the sooner realm-mates can become comfortable wearing garb and pass that mentality on to the next generation.

Friday, June 20, 2014

Welcome to Belegarth

AKA The Trials of a New Fighter

Photo © Ellie Apland
Hello, there! I couldn't help but notice you seem interested in what we're doing over here. Do you have any questions I can answer for you?

Oh? Well if you're sure, why don't you give it a try? It'll only take me a couple minutes to show you the rules.

I promise you won't hurt me if you're playing by the book. If it makes you feel better, you can take it easy on me while I'm teaching you. I'll just walk you through the motions, okay?

Great! Just grab one of those swords and shields. Whatever ones you like.

Sure, you can take two swords if you want. But it may be harder than you expect...

Okay, if you're really sure, I'm not going to stop you. Now, come over here with me and I'll run you through the basics. First of all, be careful not to hit anyone in the head. That's illegal in our game.

I promise it's for a good reason. We hit hard - it can be pretty dangerous.

Well, you'll believe me once you're fighting out there. You see, you'll need to hit people with what we call "sufficient" force for it to count. Like so.

A little more painful than you thought, huh? Good, that's about what you should expect. Now try hitting me, while I explain how you "kill" other people.

No, no, I'm perfectly fine. If anything you're hitting a bit light. You should make sure you swing a little harder on the guys out there. I think that's everything. You ready?

Good luck!

(5 minutes later)

Are you okay?! I heard you squeal from the other side of the field! Do we need to call a medic?

Oh, he just hit you in the nuts? Well, that's a legal target and counts as "death". Not like you'd want to keep fighting anyway. Let's get you off the field...

Haha, I thought you might say that. Welcome to Belegarth - there's a lot more of that to come. Enjoy!

Wednesday, June 18, 2014

Static Guard: A-Frame

This guide is for newer fighters. Some concepts below are simplified to allow more immediate comprehension and application.
Photo © Tiffany Tyler-Tyson
The A-Frame guard is often the first taught to new fighters who fight sword and board. It is relatively simple and provides a solid static defense when executed properly. As your footwork, speed, and understanding of combat become better, you'll be able to branch out into other methods with more success.

This guide assumes you are using a blue sword and a round shield.

Your Sword

The sword is the outer slant of your A-Frame. It usually isn't at a very severe angle, but the tip should be at enough of a diagonal to prevent your opponent from easily dropping their sword in the slot between your sword-tip and your head. Your hand should be fairly low in front of you, such that a decent portion of your blade is in front of your body, not over your head, and angled such that your elbow isn't sticking way out.

Why do you do this?

Without moving, your sword in this position takes away most straight upper-body shots. If you look in a mirror, you'll see that there are no obvious targets on your sword side without wrapping around the blade, moving it, or powering through it.

How do I block shots on this side?

Most shots can be blocked by moving your hand from side to side and keeping the tip stationary. You'll want to block all shots on this side with your sword, not your shield. Make sure your hand, arm, and blade snap back to your guard if you are not actively blocking or swinging.

Mistakes to avoid

  • Holding your sword too vertically. This opens up the slot on your shoulder.
  • Popping out your elbow. This allows opponents to more easily snipe your arm.
  • Keeping your hand too high. This will require you to move further to block strikes to your torso. It also offers little additional protection because the head is an illegal target in most cases.
  • Forgetting to reset your guard after swinging. It's easy to get sloppy when you're focused on attacking, and that may create openings that are not normally there.

Your Shield

Keep your shield relatively close to your body and up high enough to just cover your shoulder. If you are using a centered strap, you can try keeping your hand over your heart to start - that will help you avoid the temptation to drop your shield over time.

Why do you do this?

This keeps your entire shield side from being an easy target, without hindering your own range. If done correctly against an opponent of equal size, they are forced to wrap your shield or make you move it.

How do I block shots on this side?

Try not to move your shield much unless necessary. Many shots can be blocked simply by rotating your torso slightly. Practice with a friend to see exactly how much you can stop without letting your shield shift.

Mistakes to Avoid

  • Letting your shield drop. This will happen naturally over time if you aren't paying attention, or may occur if you're moving your shield too much, and opens up your shoulder for an easy kill.
  • Shifting your shield too far when you block or swing. If your shield is moving, you are likely creating openings in its wake. This movement will also cause you to take extra time to reset your guard.
  • Holding your shield too far from your body. This changes the angles cut off by your shield and also reduces your own attack range. Depending on your opponent and shield, it may also make it easier for them to manipulate your shield out of the way.

Your Body

The torso is held upright, often square to your opponent if you aren't moving. Your weight should be distributed between your feet to allow you to move quickly. Footwork is a large topic, and it can be done in many ways, but a good place to start is with one foot slightly further back than the other, resting on the balls of your feet.

Why do you do this?

Your torso is being used to help you block and throw shots with the aid of your feet. The torso being upright also prevents your opponent from easily wrapping over your shoulder. Remember, your shield doesn't cover the top of your shoulder or your back, so leaning forward will make some of its protection useless.

Keeping your weight distributed between your feet allows you to both attack and retreat with more options than if you put most of your weight on one leg. This means you are able to slide or step your legs out of the way if necessary, effectively protecting your lower half.

Mistakes to Avoid

  • Leaning over. This happens most often when going for leg shots and opens your shoulder to your opponent. Instead of leaning, bend at the knees to bring you down to the correct level.
  • Putting too much weight on one leg. This will get you legged often once your opponent realizes you're rooted in place. Also, you'll have a hard time moving around, away from, or through your competition.

Other Considerations

Although the above covers the basics, there are many other circumstances that can change the effectiveness of this stance. A few examples are listed below, but you'll find more as you gain expereience.

Height differences

If you're far taller or far shorter than your opponent, the shots both of you throw will change.  For example, short fighters can expect more wraps over the shoulder on average, while a tall fighter can expect their legs to be a prime target.

Range differences

Effective angles of attack change as you swing the same, straight weapon from different distances. Someone right in your face is going to have different options than the guy fighting at the edge of his range.

Weapon you're fighting against

You can expect different kinds of strikes from different weapons in the line, especially polearms. Make sure you take time to fight against many different styles and work on any weaknesses you find. Most likely, those weaknesses will be centered around footwork once your basics are solid.

Monday, June 16, 2014

Fighting as Entertainment

Fighters just don't get people who would rather watch a battle than participate in it. That's not surprising, really - they all get the itch to grab a weapon when they're stuck on the sidelines. It doesn't compute why someone of perfectly fine health won't just pick up some gear and have fun, especially if they already know the rules.

For that reason, I am often asked: how can you enjoy yourself just sitting there?

Truth be told, I don't always. Sometimes even I get the urge to fight when I sit there all day, because I'm bored out of my skull. To me, fighting is entertainment. If I'm not entertained, I'd rather catch up with old friends and take off early than observe uninteresting battles. As I gain more experience in Belegarth, I find many veterans are the same way, ducking out of practices or events that have lost their interest.

Since I'm solely a spectator, I thought I'd share what makes for good entertainment vs. poor entertainment in my mind. If you're a regular marshal, you should talk to your people directly to figure out what works for them. What's good fun for an onlooker is not always the same as for a fighter.

Things to Avoid

Huge fields

Nothing is worse as a spectator than not being able to see anything. Like any other sport, being closer to the action is more exciting. However, you'll need to be able to trust your marshals to keep the sidelines free of clumsy or oblivious fighters.

Also, huge fields mean a lot more waiting with a lot less combat because fighters need to travel a long distance to reach one another. Watching people walk around isn't very interesting.

Battles that drag out

This often happens because someone is trying to be tactical at the end of a fight and refuses to engage their enemy. Endless circling or retreating is boring for spectators. I'd much rather see the battle end quickly and decisively so we can move onto the next, than someone surviving an extra minute by avoiding combat. Keeping a field small or giving a time limit when people aren't swinging are ways to avoid this.

Regen Battles

There are a few exceptions to this, most notably some scenario battles like Capture the Flag, but regen battles are often when I start talking with other people or picking up a craft instead of watching. This is because there's no feeling of progress or togetherness, and it can be hard to follow what's going on with all the chaos. Color battles are the worst offenders in this category, which means I usually wander off about the time they start.

Things to Try

Something a little different is always fun. Photo © Ellie Apland.

Scenario Battles

There are a ton of these you can try depending on the number of people you have (e.g. good vs. evil, monarch, castle) and many fighters enjoy them as well. By giving some special goals to combat, veterans tend to engage more, and fighters will try new and unusual techniques to get a leg up.

It's also a good way to build friendly rivalries that keep things interesting. Depending on the scenario, people are often forced to work more closely with their team than in a vanilla line battle, which means they are more invested in the outcome. This leads to amusing taunts and stunts that you don't see normally.

Unit and Realm Battles

Having someone to cheer for is fun. These battles are usually the only chance spectators get to watch all their friends fight together on the same side, so they have a clear favorite. As a side benefit, the natural comradery between teammates boosts both the entertainment factor and the quality of fighting on the field, since they more likely know how to work together.

Unusual Tournaments

The usual suspects are fine to watch, but truly unique tournaments are a blast. My personal favorite semi-serious tournament is "Death in a Hat" where fighters must fight with whatever random style they draw. Anything that's fun and a little silly is great, because tempers and cheating are less likely to be an issue. Ultimately, I want to be focused on the fighting, not the drama on the sidelines.

What are your favorite battles or tournaments? Share in the comments below!

Friday, June 13, 2014

Typecasting male event-goers

An overview of some of the men you will meet if you go to a Belegarth event. What type(s) are you?

The Creeper - “Your garb is really pretty. Can I touch it?”
The man who hides behind the cowl of social awkwardness to excuse his inappropriate behavior. He's uncomfortably forward, overly friendly, and invites himself into your conversations and personal space. Don't be this guy - everyone hates this guy.

The White Knight - “Sure, I’d be happy to spar with you. Just let me finish weapons check.”
Have a question or need a hand at an event? The White Knight is right there for anything you could need. He's usually extremely busy, but will go out of his way to make the event as amazing as it can be. Just be careful not to push his good nature too far or he might become a Grumpy Old Man one day.

The Black Knight - “What do you want?”
This guy has been around for a long time and is very skilled, but he's not really interested in helping anyone else. Short-tempered and perpetually annoyed by the attitudes of his brethren, the Black Knight won't get in the way, but has no tolerance for stupidity. It's easy for these guys to have both a good reputation and bad reputation at the same time, depending on how long someone has known them.

The Stick Jock - “Why is everyone still asleep? Don’t they want to fight?”
It's all about the fighting for him. He may not be any good at it, but it's his only focus at an event whether it's morning, noon, or night. The Stick Jock's biggest pet peeves are delays to the event starting and people turning in too early. He's perpetually eager for classes, sparring, and talking shop.

The Grumpy Old Man - “Archers aren't people.” 
He's seen every stupid idea, every nasty personality, every poorly enforced rule, and somehow come out the other side still involved in Belegarth. His patience is thin and countenance is intimidating, but befriending him reveals a fount of wisdom, sarcasm, and hilarious war stories. An offering of booze can help speed up that process.

The Clueless - “Should I have brought a tent or something?”
The idea of planning is so unfamiliar to the Clueless that he barely even remembered his own gear. He's a marvel of obliviousness so enthralling that others can't help but take pity on him. The Clueless who never learns not to depend on the good will of others is how Black Knights are born.

The Drunkard - “Ugh, I’m too hungover. I'm going back to my tent.” 
This guy had the best intentions to get out on the field during unit battles, but that third shot of mystery drink the night before did him under. The Drunkard is a blast when the sun goes down but often leaves his friends wanting the next day at fighting.

The Self-Appointed Badass - "I spent twelve years studying six different kinds of martial arts, and my sensei said I was the best in the class. I think I know a thing or two about fighting."
This guy is different from the Stick Jock in that he isn't serious about learning to be good at Belegarth. The Self-Appointed Badass's ego is more impressive than his fighting could ever be. While White Knights might patiently listen to his tall tales, Stick Jocks and Black Knights will try to embarrass him on the field every chance they get.

The Bodyguard - “Just keep walking.” 
Usually a big guy, the Bodyguard watches out for people when they're on or off the field. For many female Belegrim, these guys are the big brother types who handle the worst of the Creepers. They're great at stopping fights, and despite their stature, rarely need to use anything but the force of their personality to do so.
Photo © Ellie Apland

The Roleplayer - "Good day and well met. How fares the battlefield this fine morning?"
The guys who are serious about building a character are rare, and the result can just as easily be amazing as embarrassing. Talking with them is like being at a renaissance faire or in a movie. Just beware the ones who expect you to play along, or you might be in for a very painful afternoon.

The Newbie - “Hey, can I dual-wield axes?” 
They've got boundless energy, but a tenuous grasp on the rules and questionable common sense. It can be trying, but a little patience and indulgence goes a long way as they find their own role within Belegarth. If they're willing to learn, they'll make a great addition to the field one day.

Looking for more? There's a female version, too.

Wednesday, June 4, 2014

10 things you should know before your first camping event

Your home at a camping event will probably look something like this. Photo Ellie © Apland
After weeks or months of practice, it's finally time: you're going to your first camping event. You've heard countless stories from veterans about how amazing they are with hundreds of people, incredible fighting, and a buzzing nightlife. It's a chance to see what the Belegarth community is really all about.

Well, before you head out and enjoy, there are a few things you should know.

1 - How to pack well

Packing the right stuff can make or break an event, just like any vacation. There are some complete packing guides online that you should look at before you leave, but the most important things to bring are your id, garb, and enough money to get into and home from the event. Don't forget the cost of gas! If you can afford it, make sure you have a little extra cash for emergencies, purchasing goods from vendors, or participating in special events like charity auctions.

2 - Where you're staying

You should know if you're rooming with someone else or need to bring your own tent. If you're camping with a unit or realm, make sure you get the contact information of a few members before you leave. It's also a good idea to have a rough idea of who will be the first ones to arrive.

If you can't get in touch with your friends when you get to the event, the people at Troll (where you sign in) should be able to help you. Despite their best intentions, Belegrim don't always have their phones near them, or they may not get reception while camping.

3 - What you're eating

You will almost certainly want to bring water. If you have dietary restrictions, be prepared to take care of your own needs. At some events there may be a food vendor like the amazing Lady Feri, or a couple of feasts in the evening, but that may not cover you entirely depending on the quantity and type of food you like to eat. Also, if you want utensils, plates, or bowls, make sure you bring them with you!

I personally like to pack paper plates that can be burned later and special snacks for fighting during the day. Homemade pickles are the best when you're tired and dehydrated.

4 - The Book of War

This may seem obvious, but a lot of people go to their first event without fully grasping all the rules. Knowing them well will make your event much more pleasant if you're fighting. Since you'll be meeting many new people, it's important to not cause a problem by accidentally cheating - although most Belegrim are forgiving if you're new, once you get labeled as a cheater, it's a hard reputation to shake.

Understanding the Book of War also means heralds will need to spend less effort watching you and correcting you. One less distraction for them to deal with means better fighting for everyone.

5 - How to visit other camps

If you can, get someone to show you around and tell you about all the different units at your first camping event. It's usually a lot of fun, and you'll get a good feeling for the range of Belegrim out there.

When you're walking alone, you should know how to properly approach a stranger's camp. If you're about to walk into or through someone's camp, say "Hail, [insert camp name]!" or "Hail, camp!" to get their attention. Whoever is in the area will likely say "Hail!" back or otherwise greet you, welcoming you into their camp. This is both so you don't startle anyone if you're walking around in the dark, and it's a sign of respect for each unit or realm's "home" during the event.

6 - Get to weapons check on time

Checkers give up their time fighting to make sure all gear on the field is safe. Don't make them waste more time than they have to by trying to put weapons through late. If you're late enough, they may just say that you can't fight with your equipment for the day. Weapons check is a crazy place at a big event, and checkers are trying their best to do a thorough job, answer questions, and still get things through in a timely manner.

Try to drop your gear off close to when weapons check opens, wander off for breakfast or to chat with friends, and come back to pick everything up a bit later. Don't dawdle around the weapons check area while you wait for your gear because it causes too much congestion. If you have a question about a failed weapon, try to wait until checking has died down a little to approach someone about it. If you catch them when they aren't incredibly busy, most good weapons checkers will be happy to explain exactly what failed and even how you can repair it.

7 - Don't argue with the staff

The guys running troll, weapons checkers, marshals, event coordinators, feast cooks, and security, to name just a few, give up part of their event vacation to make sure you have a good time. Respect the sacrifices they make for you by following their requests, even if you don't agree with them. Be aware that certain drunken behaviors will likely get you in trouble.

If you have a dispute with someone on the event staff, you can always calmly discuss the issue when it's appropriate, or go to someone like the Head Marshal if it's related to fighting. Belligerently arguing with staff doesn't help anyone.

8 - Campground policies (alochol, firepits, quiet hours, etc.)

Most big events will have this information posted online ahead of time, and they will post it again at Troll if it's really important. The last thing anyone on the event staff wants to do is send Security to deal with you breaking the campground rules, or worse, answer to the park or police about it. It's important to know early on if a site is dry or does not allow in-ground firepits, for instance, so you pack appropriately.

9 - Clean up after yourself

Trash being thrown everywhere or camps leaving without cleaning their site is always a problem. When that happens, the event staff members have to stay hours after the event is over to take care of what is left behind. Help ensure these volunteers want to keep running events by cleaning up your own mess properly. That means trash in proper receptacles (not the firepit) and generally leaving the grounds in the same or better condition than when you arrived.

10 - Who to go to in case of trouble

Belegrim are largely pretty nice folk, but when it's dark and people have been partying, you'll want to be sure you stay safe. Know who you can go to if there's an issue, whether it be security, event staff, or a trusted veteran. If at any time you feel harassed or nervous at night, don't be afraid to let event staff know and find a buddy to walk around with. If you're having an issue with someone during fighting, don't hesitate to speak with a marshal. You should never feel unsafe at an event, no matter your gender or newness to Belegarth.

Now that you know the basics, enjoy your trip. It should be an exhausting, awesome time that you'll never forget. And if you ever spot me at an event, please stop by and say hi!

Tuesday, June 3, 2014

The Belegarth Guilds

Artificer Guild Crest
For a very long time, Belegarth has struggled with how to appreciate and foster the growth of Belegrim who contribute beyond fighting. I'm not just talking about non-combatants; many fighters do amazing amounts of service and create fantastic garb as well!

I'm proud to announce that we've taken the first steps towards both recognizing these people and giving them more opportunities to share, learn, and grow. With the help of a few dedicated Belegrim and knights from various lines, we've put together two new national groups known collectively as "the Guilds". There is one for arts and sciences (the Artificer Guild) and one for service (the Seneschal Guild).

Are these units?

No. Guild membership has no bearing on unit membership or squireship. It is a completely separate entity.

Why are the guilds different from other A&S or Service groups?

First of all, they have the backing of knights from various lineages, giving them a firm foundation of experience. Those knights are currently acting as a council to guide the guilds until they are established enough to draw from their own members. They are designed to be open to all Belegrim who want to learn, but they also have an opportunity to earn ranks for the particularly dedicated.

Seneschal Guild Crest
This ranking system is much like squiring, designed to allow individuals to learn new skills and excel at their current ones. Becoming an apprentice is a matter of getting Council approval, where you will be given a mentor who will guide your learning process. Unlike squiring, the apprenticing requirements are nationally stable, which means a Master of sewing, for example, will mean roughly the same thing no matter where you are. There's a little more about the ranking system on the wiki, but the exact requirements are still under wraps for now.

Also, these guilds are required to keep a library that is available to all Belegrim. It is a place where guild members can put up tutorials or advice columns as they become more skilled. All Masters must contribute to the library before they earn the rank.

How do I join?

Check out the pages for the Artificer Guild or the Seneschal Guild for a complete guide. It's very easy, but there is a formal introduction you'll need to do before you can be considered a guild member.

I'm not sure if I want to join - where can I learn more?

The wiki page covering the guilds is a good place to start. Also, feel free to ask me directly. I will do my best to answer all your questions in a timely fashion.

Monday, June 2, 2014

Sewing for Belegrim: No-Pattern Tunic


Belegrim always have a lot of excuses for not wearing proper garb. My favorites are "I can't sew" or "It's too expensive to buy patterns" or "It takes too long".

Well, for all those people, this tutorial explains how to make a tunic with nothing but a couple yards of cotton, scissors, needle and thread. It's nothing fancy, but it takes less than an hour to make, even with the edges finished. Don't let the length of this tutorial fool you into thinking it will be really difficult. All you need to know is how to sew a straight seam - I'll show you the rest.

Cutting the fabric

I like my tunic a bit on the big side, so we're going to measure the fabric by folding it in half and holding it up from shoulder-to-shoulder in front of you. You'll want to line it up with about the mid-point of your shoulder. Pinch the side that has excess fabric hanging off of it tightly and lie that down on your cutting surface.

Mark where you pinched with a shallow cut. This will determine the width of your tunic.

Sliding your finger through the hole you just made and (draping it over your shoulders) figure out what length you'd like the tunic to be. I like mine a little above mid-thigh. Again, pinch the fabric at the shoulder and lie it down flat, so that the length of the fabric on the top side of the crease matches the length you want the tunic to be.

Re-mark the width, making a slit from the previous marking to the new shoulder.

Follow the line from that top layer of fabric to cut the length. I followed all the way across so I could easily make sleeves out of the excess fabric. Finish cutting the width line down to meet the length line, creating a large rectangle of fabric which will be the body of your tunic.

Quick sanity check on the tunic body. Looks long enough and wide enough to me.

Using two layers of your remaining fabric, we're going to make the sleeves. Resting it over my shoulder, I've pinched a little below the wrist as where I'd like to cut them off.

A quick cut later and we're ready for another sanity check. You can't see it here, but I actually have both sleeves layered together. So that's one rectangle for the body and two for the sleeves. You're mostly done cutting now, but keep your scraps - you'll need them for the neckline.

Assembling the body

To avoid any confusion, lay out your tunic pieces so they look like a tunic, just without the neckhole or stitching. Now, one at a time, you're going to sew the sleeves.

I don't have a picture of this, unfortunately, but what you'll want to do is flip one of the sleeves over the body like you were folding a shirt. This will keep the raw edges flush with one another, but the sleeve will now lay across body with folds touching along the top.

Now flip the sleeve over the top of the body so it wraps around the body fabric. The fold that goes over the shoulder should still line up.  When you flatten out the body fabric, it should look like you've centered the sleeve rectangle on it. 

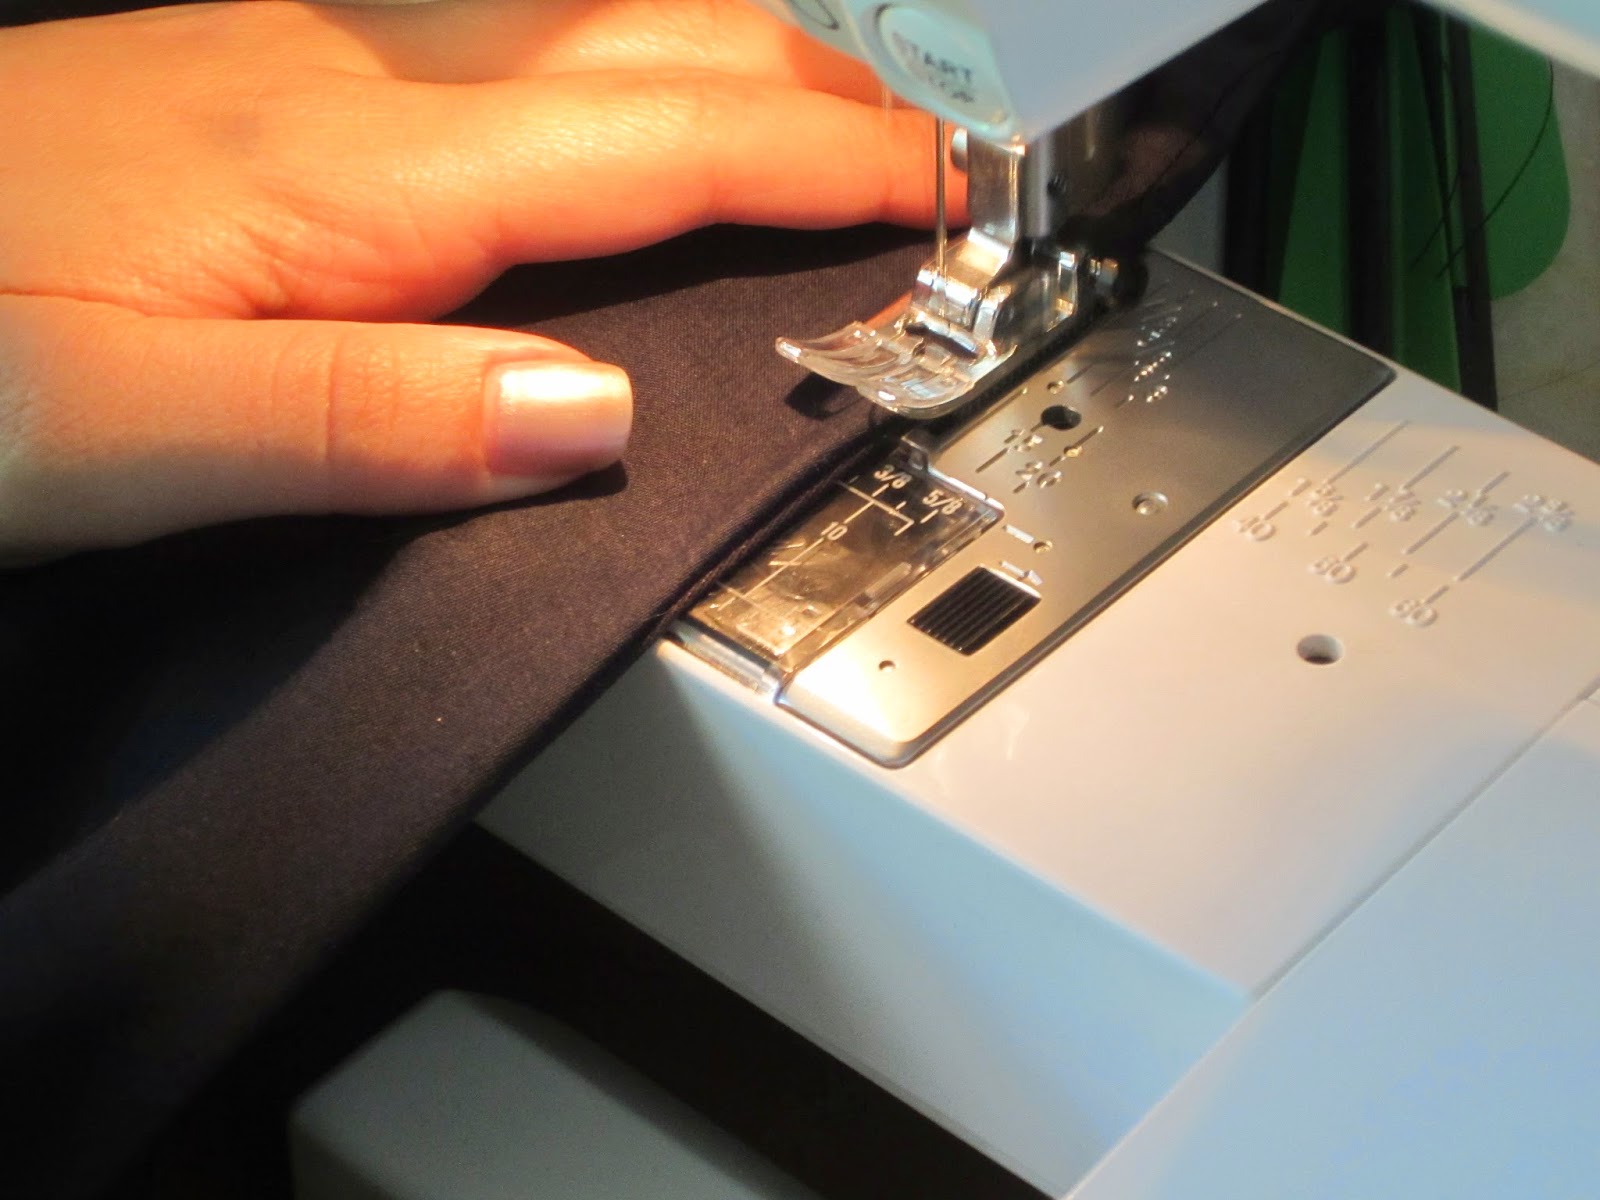
Make sure you start sewing on the "body" portion of the fabric and then stitch into the sleeve. I like a 5/8" seam, but you can use whatever works for you. You will likely need to pinch the fabric to keep those raw edges from slipping apart.

This is one of the tricks I like to use when sewing long seams without pins. I will pull the fabric taut very gently, which keeps the edges from sliding much. Be very careful not to work against the machine by pulling too hard! That's a good way to break a needle.

Okay, one sleeve done!  Now we need to match the second one with the first. Here, the first sleeve is laying flat at the left, while I've folded the body fabric lengthwise. This will make it easier for me to line up my sleeves perfectly.

You can see how I've made sure these sleeve match up. Notice that on both sides, the sleeve is on the OUTSIDE of the body fabric. It's very important to sew them both on the inside or both on the outside - if you do one of each, you will have raw edges on the outside of your tunic at the end!

After sewing that second sleeve, we can lay out our tunic again with the newly sewn edges on the outside. All that is left is sewing the long seam on either side that closes both the body and the bottom of the sleeves. The only "tricky" part is the 90 degree angle at the armpit if you're using a sewing machine. You may want to reinforce the stitching in this area as well because it tends to wear quickly.

When you get to the armpit, stitch a full seam-allowance past the corner and stop with the needle DOWN in the fabric.

Lift the presser foot, turn the fabric 90 degrees so you're ready to sew another straight seam, and lower the foot again.  Continue on your way. 

Double check your work.  You can see all my seams are on the outside, which is correct.

Turning the tunic right-side-out

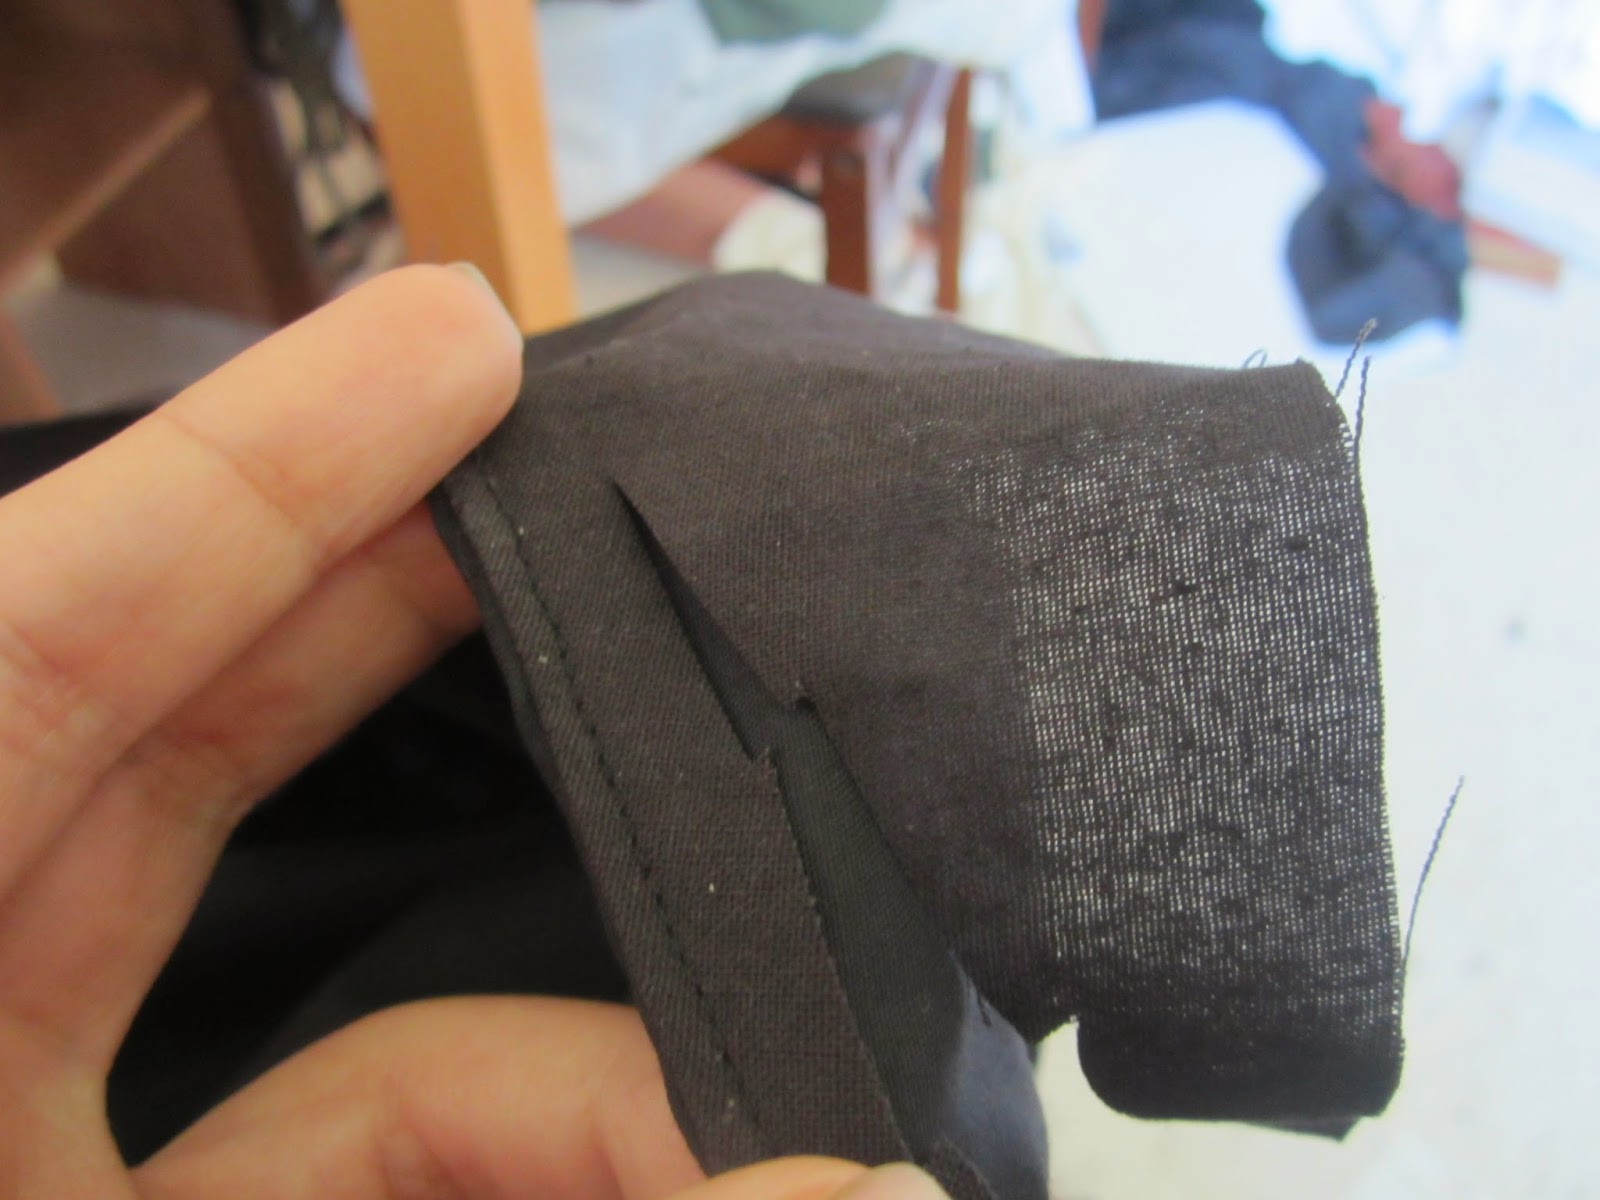
Okay, now it is time to turn this guy right side out!  If you just turn it as it is now, you will probably see what happened above in the armpits. All that fabric on the inside of the seam causes it to pucker funny instead of giving you a tight corner.  No problem, just flip it inside out again.

Clip the corner with your scissors.  That means making a single cut to (but not through) the stitching in the corner.

Turning it out the right way again reveals a much sharper corner.

Once you are done, it should look like a real tunic. You just need a place for your head.

Making the neckhole

Decide how big you want your neckhole to be. I wanted mine particularly wide, so I checked against an old tunic. You can see that it's about half the width of the tunic, just centered.

Take one a scrap of fabric and wrap it around the top of the tunic. It should be larger than the neckhole you want. It doesn't need to be beautiful, because it will be turned inside eventually.

Cut out your neckhole through both the scrap fabric and the tunic fabric, just a tiny bit smaller than you want the final neckhole to be. You can see I've cut fairly straight across the back, but a v in the front.

Sew close to that cut edge. If you're using a sewing machine, you'll want to wrap the neckhole around the arm of the machine as shown above. You're just sewing a big circle, so you'll eventually come back to where you started.

Sewing finished. You'll notice I made a little mistake at the right side and ended up cutting the scrap fabric to make sure it lays flat. Don'y worry, it won't be visible on the front.

Start turning the scrap fabric inside...

Until you have your final neckhole with the scrap no longer visible.

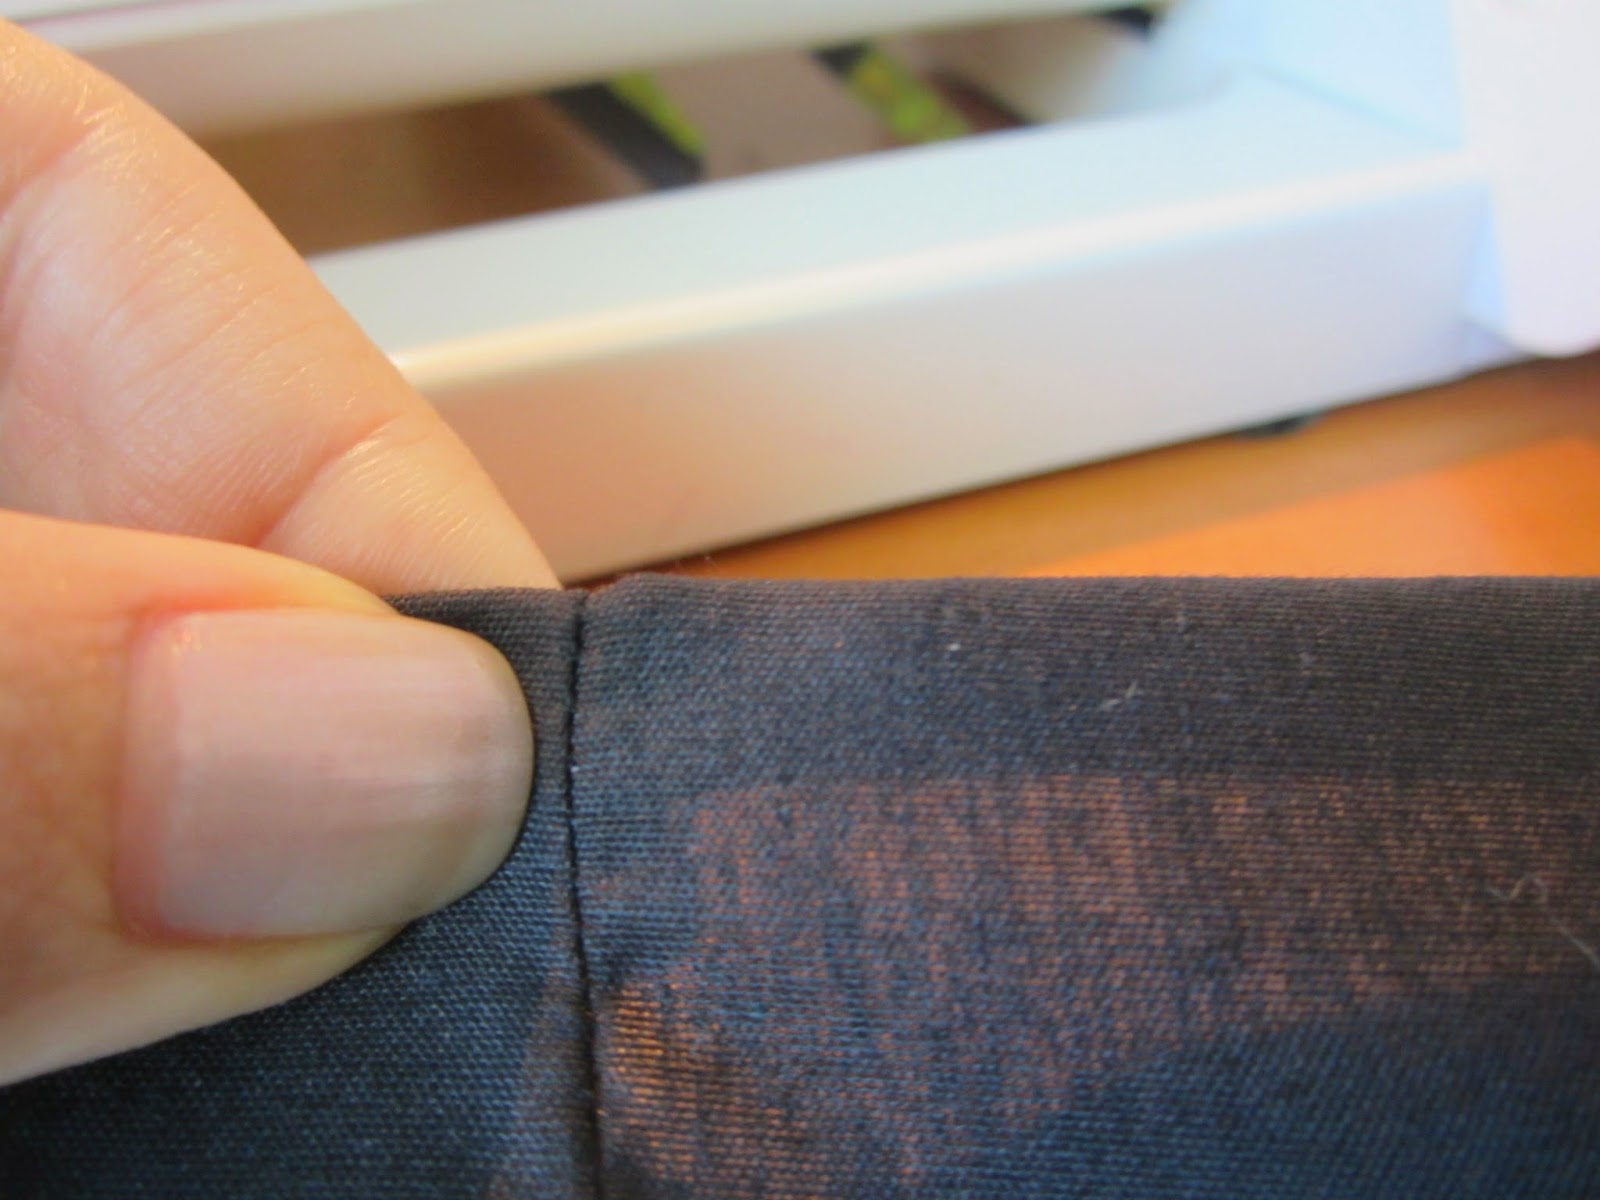
Sew right along where the two piece of fabric meet. You can see the neat seam it will make.

Trim off the excess scrap fabric on the inside.

Hemming the edges

You now have a wearable tunic! But we're not quite done yet. Those sleeves are a bit long, and we don't want the raw edges to ravel, so it's time to hem.

If you need to shorten your sleeves, cut off the excess fabric. I like to leave mine rather long, so I'm just trimming a little.

Now fold the edge down once, then a second time. It will make a nice folded edge on both the top and the inside.

Sew close to the outer folded edge. Since we aren't using pins or an iron, you'll need to keep turning the hem under as you sew. I do so by stopping with the needle down, gently pulling the fabric taut, and folding it under once....

...then under again. Continue for both sleeves and the bottom of the tunic.

And there you go - one finished tunic! Once you've mastered the basics, there's a whole world of embellishments, patterns, and techniques to explore. That is a post for another time, but don't be afraid to experiment on your own.

Delivered by FeedBurner